Help needed developing a "matrix controller" for my Lumen Lights

Hello fellow light and lighting tinkerers,

though I have been absent for a while due to private reasons, some of you may remember me and my saltstone lights (@KandelaLabs). I am building up a small lighting business with many opportunities waiting, but sadly I lack in the technical skills to build a fitting WLED controller for myself. So I recently focused on prototyping the frames around a commercial lighting system instead of tinkering around with WLED – Until now

Nevertheless the frames are more or less light source independent, so I still could (and plan to!) use my “matrix controller” into them. My goal here is to be able to order them in smaller (and soon maybe bigger) badges pre-assembled, so I can just put them into the frames/lamps in conjunction with a ws2812b matrix and a fitting power supply.
Yes, there are already some commercial available ones (hello Quindor :wink: and some other designs made by you guys (hello srg74 ;). But as the controller must fit specific requirements, it has to be a dedicated design (or at least some variant of the existing ones). Without going into details at this point, some crucial requirements are

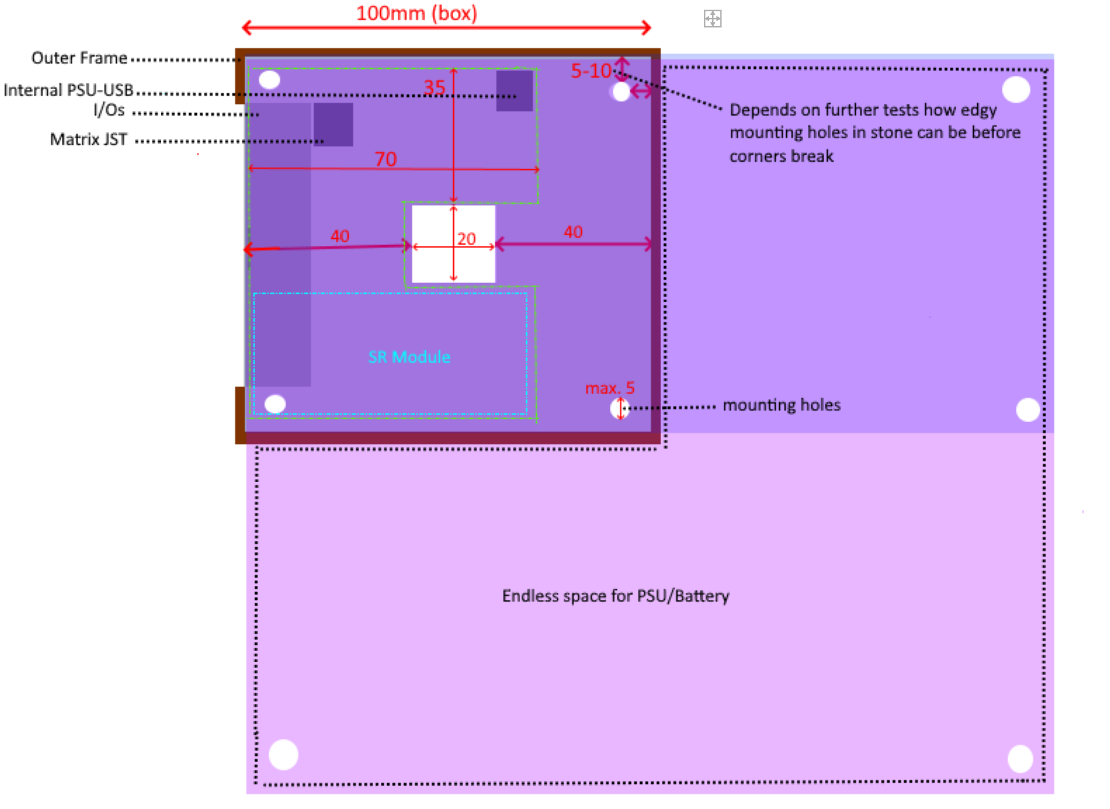
  • The controller has to be as flat as possible while exploiting the larger amount of the base area (aprox. 10 cm x 4 cm). The current ones are too “clumsy”.

  • As a (Natural) User Interface, Id like to implement a rotary pushbutton wheel for a comprehensive, intuitive and haptic control (I already put a lot of thought into a menu logic for this, but I see it as a bit of a dedicated sub-project and will probably discuss this in a dedicated thread)

  • All the I/Os must be next to each other at one side (DC, power switch, pushbutton wheel, mic/line-in (optional), status LED (optional))

  • My primary model is designed as a “mobile” light, so it also has to be powered by an internal power supply (powerbank via USB, LiPo plus MCU or a 18650 based solution)

  • The controller is focused on three sizes (8x8, 8x16, 16x16) of ws2812b matrices, so it (and the PSU) has to be less universal

Though there are still open questions, the core requirements should hold up further design iterations. But alone I cant get closer to something more MVP and less frickelfrackel (One of my older but still very impressing prototypes below).
Soooo, here I am looking for some (at least semi-professional) help that can go into different directions:

  • We can handle this as an open design project. If I get this done with your help in this way, I am willingly to share my designs and construction plans with the community. So everyone can build a Lumen light for herhimself (or variants of it, there are already more awesome use cases and designs for such a controller :wink:

  • I am pushing this project as hard as I can to be a (small) ambient lighting startup that does not only produce awesome lights but also is present at festivals, open airs etc. I am open for some joint ventures and would be happy to have a technical developer for these activities one day; the controller is the entry to this world, so possibilities are waiting and I am looking forward to 2022 when culture will rise again :slight_smile:

  • I even could imagine just buying the controller from an external source

  • Or of course it can be a mix of all this.

Bottom line: Alone I am stuck at this point and would be really happy if some/one of you may be interested in making Kandela Lighting rise, the end of the rainbow is in line of sight <3

If you want to know more about all this, feel free to contact me here or via the discord.

May the light be with you

Kelvin

PS: Dont believe the crappy cam pics, the lights are “un-captureable” (7 out of 10 who see it wanna buy it :wink:

1 Like

Some design sketches

@Quindor recently developed an ESP32 board that can be used with our without a DigUno or DigQuad power distribution setup. It is very flat. 90-degree bent interface pins can be soldered in and used to connect external devices for quick prototyping, and replaced with soldered wiring for permanent installations. I mention that option because it might be a good solution once your demand ramps up and you do not have time to deal with cheap knock-off ESP32 boards where more than 50% of the boards have bad or flaky ESP32’s.

These look amazing. Especially the ones that are whiter with veins or fractures.

@huggy-d1 Thanks I will give it a try and order some/one to evaluate. Thing is while trying to keep all this secret until I am ready with my product and production setup I have about 40 pre-oders (showed it to about 050 people). Guys even would buy my clumsy only-sometimes-working prototypes for good money. But when thinking about having to produce just these 40 I instantly want to quit this project bcs. all this work. Thats the reason why I also concentrate on a good production design with easy-to-execute, simple and few steps to not be overwhelmed with all this “boring” work.

@Artacus
Thats one of my newer creations (I call this model - compared to the Vulcan- the Lumen Glacier) that has a very basic design made with white salt stone rocks. Here I used a Downlight that I would substitute with a 8x8 matrix or a concentric ring; but even just stuffing a common strip into the pot will make some awesome lighting.

I was talking about the slabs like in this one. That just looks absolutely amazing. I don’t know what the strength or cost is. Imagine a kitchen island topped with that and coated in epoxy for protection.

Ah, my Lumen Prime, the first one. It is hardly to imagine, but I indeed used red stones, no white ones.^^ I wrote down some words about the construction here. The stones arent the critical financial aspect here. In some larger quantities Id pay about 75€ for 1 qm. In this built I used 7 stones a 10x20 cm with 4x 8x32 matrices. Pretty much an overkill, nearly never run this with more than 20% brightness. But the light itself… Jesus, you cant imagine how this looks in real. I built this light again with only strips that also looks pretty neat, so with some fine tuning regarding the spacing a similar effect should be reached with one or two strips per 10 cm broad stone lane.
You can pretty easy build some larger panels with the stones. In a sauna floor setup you first grind the layed out stones, then you wet it and mop it. Then the salt dust grouts the gaps and you have one big area.

Holy… this one turned out to be epic. I simplified my design again and built this one as a shelf light. For testing reasons I just squeezed a strip into the frame and well… such awesome lighting already. I call it the Lumen FrostFire <3

Ok, to getting my blind spots enlightened, maybe you guys can help me with sorting thoughts and some concrete questions.

What parts do I need?
When determining the necessary parts, the biggest variable seems the whole power stuff to me.

Specifications

  • LED-use is limited to WS2812B/5V with 64 (8x8), 128 (8x16) and 256 (16x16) LEDs
  • One controller/PCB for all models (or at least simple variants), meaning size is limited to 4x10 cm (enough size for a small internal battery), but power should be sufficient for a 256 LED matrix. If the height can be kept under 20-25mm, I could live with a trade-off in the ground area size
  • The lights should run via DC and via internal PSU (either one can use the own powerbank and/or we install a solution)
  • The internal power supply is connected via USB, either with 2 cables (USB A and micro) or 1 cable (USB C)

If possible

  • it is powered by a Huawei SuperCharger and a USB profile5 cable (4,5A should be enough for even 256 LEDs and extends lifetime)
  • Besides the on/off state there is a charging/eco mode. In this mode the power consumption is limited; to 1-2A running without DC/USB and a powerbank/battery connected, or to 2-3A with DC/USB while charging the battery. At the normal on-state the light runs on either 2A (battery) or 4,5A (DC/USB).

General specifications/ design considerations

  • The audio reactive stuff (mic/line-in, later Bluetooth) is optionally installable as a module (my grand mom doesnt it) but if additional costs can be kept low enough I would go for a genuine approach here.
  • All I/Os at one side, user friendly arranged
  • A user friendly I/O to update the WLED software, integrate further effects and a way to reset the ESP/WLED to “factory” state (our modified/pre-configured version)
  • Some feedback element (LED?) for charging status and eventually mode/menu status (But that can be put off because no one likes more blinking LEDs)
  • Besides bluetooth for audio, perspectivaly I wanna use a paj7620u2 gesture module for the UI in later stages of the development

That said, I wonder what a) parts I do need in general and b) what needed parts I should (first) choose in specific.

  1. ESP - I would go for Quindors version
  2. On/Off switch - maybe one with 3rd state (eco/charge)
  3. Pushbutton wheel
  4. PSU/PCU - Though there are endless charging modules on the market, I wonder if there may be one that fits my specifications best
  5. Audio Reactive Stuff
  6. Further Stuff (Resistor, Capacitor, SMD diode, Fuse, temp sensor, level shifter, feedback LED) - What do I really need here respectively what I dont?

Thanks for any advice!
KeLvin

Sizes and Measures

Ok, let me elaborate my background deliberations about the size a bit.

First of all, I less design single lights, but more of a genuine light-construction-system. Meaning though every light may be unique in lighting and appearance, their building follows (more or less) the same procedures with similar parts (In a post MVP phase I want to have it so modular that parts between models can be interchanged → e.g. upgrade your light with another stone and a new outer frame, give the “old” parts to a friend who now only needs an inner frame to build an own light for himself). Furthermore the production design would split up into a pre-assembly-phase (where parts are produced) and a simple-as-possible assembly phase where the light is put together, so that for logistical reasons lights are sold (and later sent) as a construction kit.

The light size itself (and such the controller) is specified by the common stone sizes (10x10, 10x20, 20x20) that perfectly fit the common matrix sizes (8x8, 8x16, 16x16) that - on an alu plate - will be put on top of the controller box.
The controller/PCB itself should be of 9-9,5cm length (10cm - 2x 0,25-0,5cm for the thickness of the box)

Besides these three frame-design models (prio 1) I want to use the controller also within a socket-design (prio 2), where a central alu square is routing LEDs and cables. Thats where the 4cm originated from (2cm for a central square = 2 x 4cm free space at the sides). 10cm x 4cm (instead of 10x10 with a central whole) was originally chosen because of the needed space for a power supply. In a 20x10 light these 16x10 leftover space would be sufficient for a powerbank or LiPo.

But for the sake of the practicability I would accept a trade-off here. For both the 10x10 and 20x10 light the PSU/battery could be attached below the controller, as they look fine with a higher frame. The 10x10 stone is on a 10 cm height frame, the 20x10 stone currently on a 4 cm high frame. For aesthetical reasons I want to keep the golden-cut: 5cm high stone on 10cm high 10x10 frame, 4cm high 20x10 stone on -currently- 4cm high frame (normally stones are either 5 or 2,5cm high, this one is 3-5cm high due to its raw structure). An exception here is the 20x20 light that currently has a 2,5cm high frame. First this looks pretty neat with a 5cm high stone. Second as this light is also been thought of a vertically wall-mountable-light (with a 2,5cm high stone properly attached, but that mechanism is another story). Space for any kind of PSU/battery on the same level shouldnt be a problem, too. So the height (of the box) shouldnt overextend 2cm (+ 0,5cm attached LED matrix = 2,5cm high 20x20 frame) if doable.

Another variable is the third (not yet completely specified) shelf-design that the new FrostFire is following. But clear here is, that the frame depth shouldnt exceed 10cm. With space for the stone calculated there is a leftover of 7cm. Ways to go from here: 1)limit controller overall size to 10x7, 2) make a slightly different controller.

Oh… One crucial aspect I just recognized… Problem: For the socket design all I/O stuff has to be at the back 10cm side (given a 10x7 size). But for the shelf design I/Os wouldnt be reachable if directed to the back, so it needs some kind of side access. In theory this could be solved with a 7x7 controller, but thats hardly limiting the space and complicates things again, so I am a bit unsure and have to think about it. A spontaneous possible solution: As socket and shelf lights are not focused on audio-reactivity, the core controller could be 7x7 with the option to add a 3x7 SR module for the frame-models. Or as another trade-off I could install a 10x10 controller in a standing way, not elegant but practical.

As mentioned, this would be the ultimative all-in-one solution that would allow me to build dozens of different but similar lights based on 3 designs that all are based on one controller. A visualized jack-of-all-trades would be sth. like this one:

Thanks for reading (and thinking…)
Kelvin